3rd Makeup Application Practise Session (Tara's and My Designs)

Tara's Design (Me as Makeup Artist)


For our final practise sessions we wanted to perfect the looks in the allocated time slot of an hour and 10 minutes. When I did Tara's makeup I applied the makeup following her step by step and list of products to create the look with the techniques I have used in our previous sessions and Tara gave me her feedback after. 

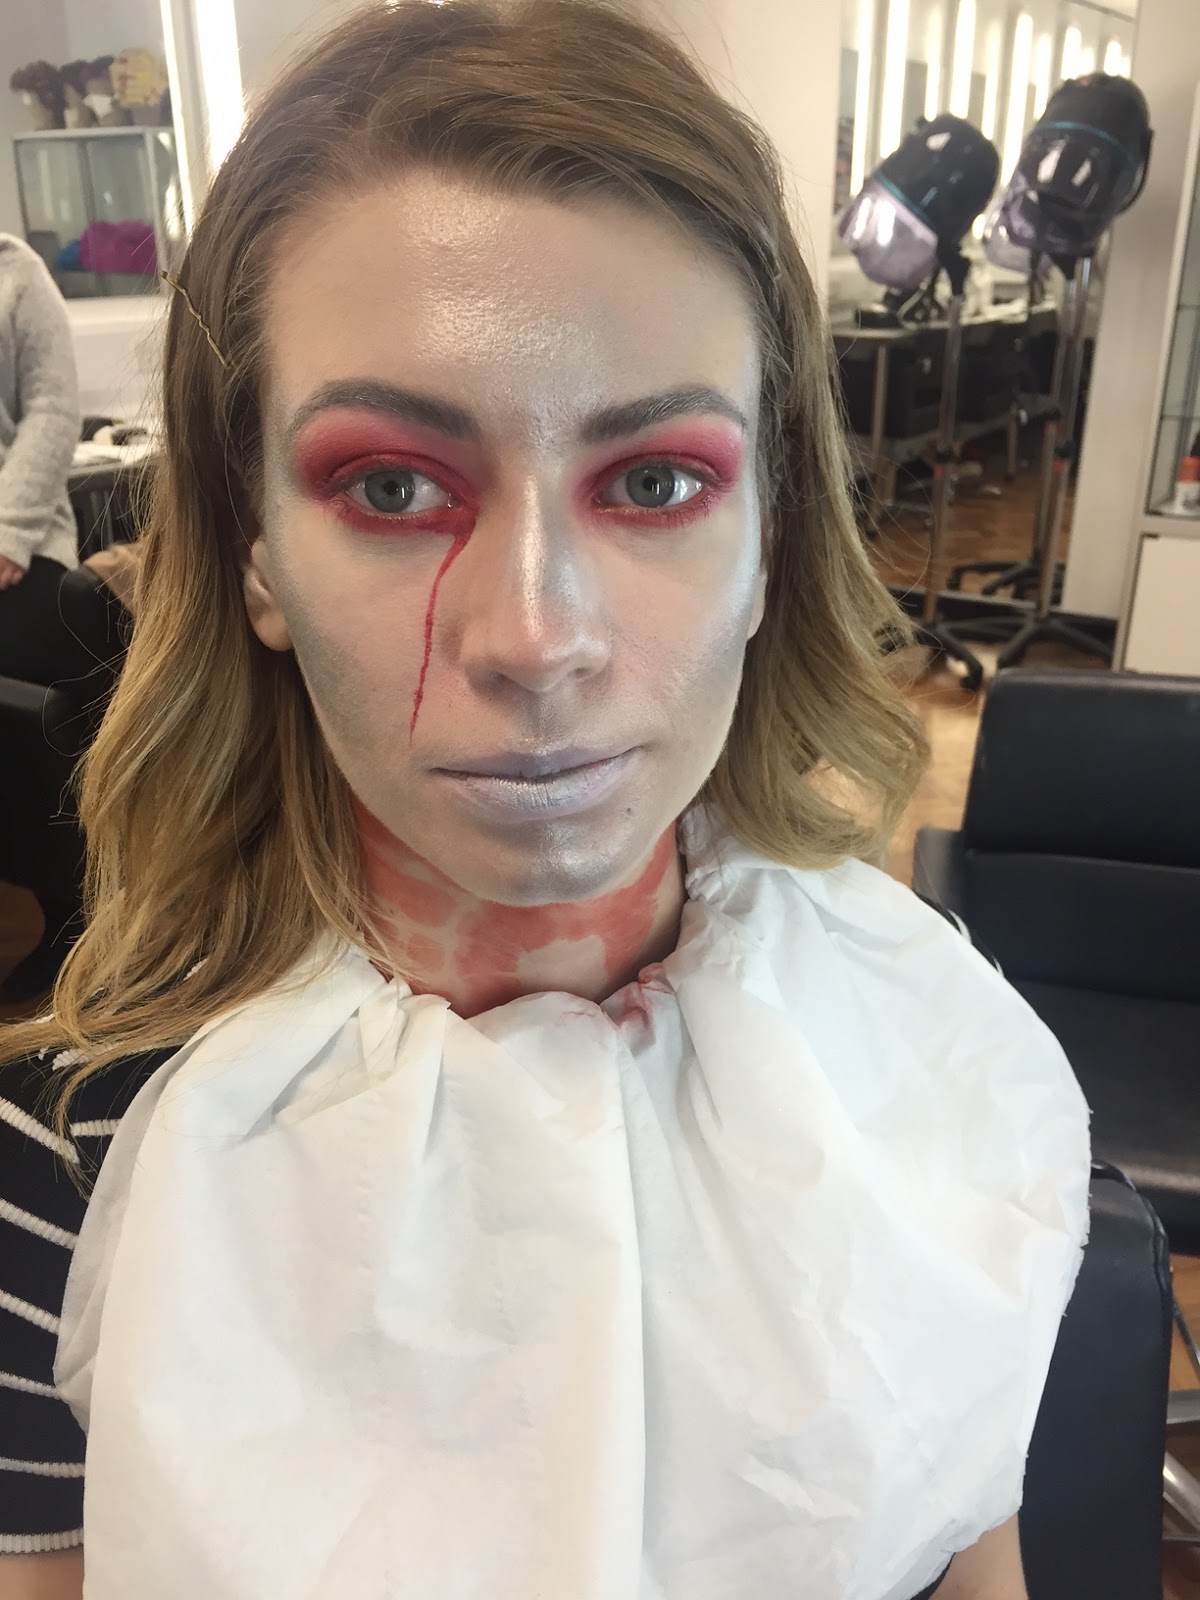
I completed just in the timeframe (almost the full hour and 10 minutes) and Tara was pleased overall. In this trial run Tara felt the eyeshadow came to high and wasn't round enough. We agreed that for the assessment I will just apply the colour on her eyelid and blend out from the crease to have more control on the shape and softness. I feel the eyes are the most time consuming for me to do so now we have found a quicker technique I should be able to achieve the look much quicker. She was much happier with the tear drop this time as it was thin and delicate and we also used fake blood in the tear duct to add wetness to make it look more realistic. The silver glow was in all the right places, however, I think that the chin and underneath the cheekbones needs a bit more blending to make sure there are no lines or too much product built up in one place. Overall, I am confident I will be able to complete the look in the allocated time and apply the look how Tara designed it to be.

Also, for Tara's hair we decided to have her hair in milkmaid braids with loose curls framing her face to leave the focus on her makeup but the style will be messy to incorporate her New Elizabethan lady-in-waiting character design.

My Design (Tara as Makeup Artist)


In Tara's practise session she completed the makeup with about 20 minutes to spare. However, in this lesson we did not have all the products to complete the lips so we left this step out and Tara was confident with the amount of time left to apply the lip products. 

Tara perfected the base by buffing it into the skin a lot to leave a flawless base and applied the glistening blush in all the correct places. I noticed that it needs to be blended further into the hairline on my forehead so there isn't a line (the two photos on the left show the difference after she blended it more). Tara has also got to grips with the shape I designed for my eyes and completes the eye process much quicker than before. She also applied more cream highlighter on top of my cheekbones but also on my cupids bow, forehead and nose which I feel perfects the skin more to add to the glowing 'bridal' look I designed. This was a very successful final trial before the assessment and I am very confident that Tara will create the look beautifully on assessment day.

We also decided after this practise that instead of having my hair scraped up and away from my face, I would have my hair curly with two plaits on each side to pull away the hair from the face to frame the makeup. We want to have it down and curly to embrace the bridal aspect of my New Elizabethan lady-in-waiting.

2nd Practice With My Design (Tara as Makeup Artist)

Following my second attempt of Tara's design in our second practise session, Tara then had another go at perfecting my New Elizabethan makeup design. As I am extremely pleased with the outcome, there are lots of photos from my phone and also on a Canon 550D with a 50mm lense to see the outcome in a photograph  that will be taken on the assessment day.

The same process was used from our first attempt but there were some additions to really make the skin glow and the lips pop:

  • Tara used two products in her own kit to make my skin and cheekbones glow even more than the first attempt - a cream highlight from Topshop called Glow and a powder highlight from MAC called Soft and Gentle. These were layed on top of each other to get the glow that is obvious and beautiful in both types of photos (on mobile and in the 550D).
  • Tara did not powder until the very end to avoid trouble blending the cream products
  • The blush we used was more iridescent and sheeny (Illamasqua - Ambition) to add to the glow-from-within look I want in this bridal look. Tara also worked it in a lot more so it was blended but still obvious in photos so the flat didn't look flat
  • A lipstick from Nars was used (Decanso) instead of mixing the colours in our kit to get the perfect colour I wanted
  • A lot more of the multi gel was used on the lips to create an opaque finish
  • Eyelashes were curled before the application of the white
Tara completed this look within the time limit and I feel this attempt is amazing! All the parts of the skin I wanted to be dewy are, included the sheen on the eyes, and the blush is much more obvious in the camera and added more dimension to the skin - making it a more interesting look. Tara has perfected her technique to apply the eye makeup - which was the most time-consuming aspect - which has made her much more relaxed about the whole thing! The only step that was missed by accident was concealing under the eyes which will be included to finish off the flawless base. Overall, everything went to plan but the only thing I would change is that the blush applied on the forehead needs to be blended a bit more as in the 550D photos it is quite an apparent line up close.

Above are some close ups of the complexion and the eyes (which look beautiful I think!!!). The next set of images were poses Tara asked me to do to portray my character more through the photos. The first was to indicate my love on my wedding with my hand on my heart. The second was more of a 'dreamy' look and the third image shows that I would be wearing a white fur collar (which I discussed in my character design) which I would be holding and would try and convey a flirty look with a smirk or open and glossy eyes looking directly at the camera.

My Makeup Notes for Tara as the Artist

Consultation Notes for Ellie Nevill's Makeup Design –
Makeup Artist Tara Page

Equipment list:
  • Gown
  • Cleanser, Toner + Moisturiser
  • Cotton Buds and Pads
  • Expert Face Brush
  • Kabuki Brush
  • Rounded Brush
  • Small Foundation Brush
  • Blusher Brush
  • Contour Brush
  • Flat Top Brush x3
  • Blending Brush x2
  • Foundation Brush
  • Powder Puff
  • Powder Brush
  • Duo Fibre Powder Brush
  • Angled Brush
  • Small Lip Brush
  • Disposable Mascara Wands

Products:
  • Illamasqua Satin Primer
  • L'Oreal Lumi Primer
  • Illamasqua Skin Base in 001
  • Illamasqua Skin Base in 5.5
  • Kryolan Camouflage Concealer Palette
  • Topshop Cream Highlighter in Glow
  • MAC Highlighter in Soft + Gentle
  • Illamasqua Sculpting Duo
  • Illamasqua Liquid Metals Palette
  • Illamasqua Pigment in Beguile
  • Illamasqua Loose Powder in Translucent
  • Mac Pigment in Copper
  • Illamasqua Blusher in Ambition
  • Nars Lipstick in Descanso
  • Kryolan Multi Gel in Pink

Method:

  • Set up work station and check all needed products and equipment are out
  • Cleanse, tone and moisturise the model's face
  • Apply a mixture of both the primers all over the face with the expert face brush to buff it in fully
  • Mix both skin base shades to make a foundation colour a shade lighter than the models and apply with the same brush as the primer to make sure it is glowing
  • Apply a concealer shade that matches the base and apply.
  • Buff all the base into the skin to achieve a flawless finish
  • Use a small foundation brush to apply the cream highlight on the tops of the cheekbones, on the nose, chin and cupid's bow and go over this application with the powder highlight to intensify
  • Plot out the shape of the copper shades of eyeshadow with a flat top brush and the copper liquid metal shade and fill in
  • Blend the edges to make sure there are no lines
  • Apply loose powder heavily under the eyes to catch any fallout of the eyeshadows
  • Apply the copper pigment with a flat top brush onto the eyes
  • In the middle of the eyes and under the lash line, apply the silver shade from the liquid metals palette in the centre of the eyes
  • Over the top of the silver, apply the Illamasqua pigment with a flat top brush and blend to create soft edges
  • Powder the forehead and under the cheeks to these areas
  • Apply the blush heavily on the cheeks and blend
  • Spread this colour onto the temples and under the jaw and blend
  • Apply the lip colour with an angled brush
  • Layer on the multi gel onto the lips to create an opaque layer of glitter

2nd Practice with Tara's Design (Me as Makeup Artist)


Tara and I took the oppotunity to use the studios on friday evening to get an extra practise session. The image above is my finished photographed second attempt of Tara's makeup design. We have been using a Canon 550D and a 50mm lense after our makeup application to test how the makeup appears under the light and in the images that will be taken in the assessments.

I followed the same procedure I used on oru first attempt, which I explained on this blog post, but some things were added to give the finish Tara wanted. These changes are as follows: 

  • Use a mix of the Illamasqua Satin Primer and L'Oreal Lumi Primer to create a very glowy base that prevails through the base
  • Add a shimmery eyeshadow over the silver highlight to amplify
  • After applying the red lipstick as a base for the eyes, use translucent powder to set so there are no creases on the eyelids
  • Blended the white lips more into the skin around it so they do not look too obvious
  • The tear was create with red eyeshadow and mixing medium instead of water (it was still painted on). Fake blood was added in the tear duct and dripped down slightly to add more dimension to the tear
I feel this attempt was much more successful in regards to what Tara designed and wants in the final photos. The skin is much more visibly dewy and the silver is more striking in the completed look. The eyes are nicely blended and were not creasing when photographing and the tear is less bold and flat. I do feel it still is completely how Tara wants it as it is still slightly too thick so I will try and perfect this in another practise before the assessment. She was also happier with the placement of the bloody hand so I will repeat this next time. I feel that in this second attempt the whole look ties together a lot better and I am very pleased that overall Tara is happy with it. Next trial session I will be able to practise this exact process and perfect the blood tear.
We also tried out some more ideas for poses for photos we want to have for portfolios in the future. I asked Tara to have more emotion when placing her hands on her head to look distressed and upset (to go along with her character). The other two images we wanted to portray her subtly as sorrowful and lost.

Tara's Makeup Notes for me as Artist

Step by step for Tara's makeup design

Tools

• Flat foundation brush
Kabuki Brush
• Fluffy powder brush
• Flat eyeshadow brush
• Fluffy blending brush
• Small blending brush
• Very fine artist brush
• Angled brush

Products

• Luminous primer
• Foundation pallet
• Illamasqua skin base 001
• Illamasqua loose powder
• Illamasqua liquid metal pallet
• Colour Infallible eyeshadow by L’Oréal in the colour 001
• kroyaln lipstick pallet
• Kryolan Bright’s pallet
• Mixing medium
• Fake blood
• Matt grey toned eyeshadow

Method

• First using your flat foundation brush apply the luminous primer all over the face.
• Next apply your foundation to the face and lips with the same brush, a couple shades lighter than the natural skin tone, mix some primer into the foundation to make it super luminous.
• Now buff in using your kabuki brush.
• Apply concealer in the same shade as the foundation to the under eyes and any blemishes.
• To highlight the face mix the two silvers from the liquid metal pallet together and apply to high points of the face concentrating on the cheekbones.
• To intensify this highlight you can put a colour infallible eyeshadow by L’Oréal in the colour 001 time resist white on top using a fluffy powder brush.
• Use loose powder to matt down the areas where you haven’t used the silver.
• Place allot powder underneath the eyes to catch any fall down.
• For the eyes first start by using a flat brush and apply a red lipstick from your kroyaln lipstick pallet in a round shape just above the crease and under the eye.
• Blend with a fluffy brush.
• Set the lipstick with a loose powder.
• Now to intensify this colour apply a red eye shadow from your Kryolan Bright’s pallet with a flat brush only to the mobile lid.
• Now buff the edges using a blending brush so that the colour fades from dark on the lid to light around the edges.
• Use a small flat brush to push the red on the bottom lash line and blend out, take the colour all the way to tear duct.
• Blend the colour slightly, but not to low down.
• For the eyebrows fill then in using a matt grey toned eyeshadow and an angled brush. Using a mascara wand brush through the brows with a small amount of silver from the Liquid Metals pallet.
• For the lips on top of the foundation apply a small amount of sliver in the centre.
• Now to create the tear mix red eyeshadow with mixing medium from Ilammasqua and paint on using a very fine brush. In the tear duct area place a small amount of fake blood and allow to dribble down slightly.
Finally for the Hand print cover your hands in red supra colour, now place the hand on to your models neck to make the print.

1st Practice With My Design (Tara as Makeup Artist)


In this practise session, I handed my design over to Tara and she was able to have her first go at translating my design to my face. 

Tara began by applying my base. As described on my face chart, I wanted to mix a foundation shade that matches my skin with Illamasqua skin base in shade 001. In Tara's kit she has another Illamasqua skin base in 5.5 that suited me and had a lovely dewy finish so we decided to mix the two together to create the pale complexion I wanted. Tara then concealed under the eyes with a mix of concealers from the Kryolan Camouflage palette to finish off creating the flawless base. 

The next step was to create the heart-shape eye makeup with coppers and silvers. The illamasqua liquid metal copper shade was used as a base for the eye makeup for Tara to map out the shape and create a layer for the pigment to sit on and be amplified. Copper Pigment by MAC is used to create the final colour on top of the base and I chose this product as it is very opaque, leaves a beautiful sheen and is easy to blend. In the middle section of the eye look, the silver shade from the liquid metals palette is use. Beguile pigment by Illamasqua is placed on top and on the bottom lash line to finish off the eye shadow. A small amount of Skin Base in 001 was applied onto the eyebrows with a mascara wand to subtly colour and shape them and the eyelashes (top and bottom) were coated in this colour. 

A small amount of contour was added from the Illamasqua Sculpting Duo in the hollows of the cheeks to shape my face. Following that, the light pink from the Classic Blush palette
from Kryolan was usedd on the apples of my cheeks to added to the complexion and was placed in that way to reflect back to the trend in the Elizabethans. To complete the look, Tara applied the light pink shade from the Kryolan Lip Rouge palette all over the lips. The shade was not right for my look as it had blue undertones and was almost to 'barbie' like for a bridal look. A nude shade was added on top but we were going to look for a lipstick to use alternatively next practise session. Tara applied the multi gel glitter in a heart shape onto my lips. We both agreed it looked a bit out of place so it was applied all over quite heavily to create an opaque layer of glitter. 

Overall, I was extremely please with the finished look for the first attempt. The eyes are almost perfect. The shape is exactly how I wanted it apart from a little more blending needed and the corners by the end of the brow are too angular - both of these point I passed onto Tara for next time. The base was lovely too, however, I do feel it does need to be a bit more glowy so more products may be needed for highlighting or more dewy primers. Also, after showing Sue the finished look she advised us both that something was needed on the forehead so the blush was blended up onto the temples and jaw line which was more effective in the images. However, I would like to make this change much more obvious in the makeup look to show up more dramatically in the final photos. I would also ask Tara to make my lips more defined next practise session. Finally, we both agreed that the eyelashes will need curling to be more visible. 

A few snapshots of the steps included in the design 

1st Practice with Tara's Design (Me as Makeup Artist)

Today was my first try-out of Tara's makeup design. Her character has been accused of killing the queen and is dreadfully distraught following this event as she was a loyal lady in waiting. Tara included a pale base to reflect the Elizabethan trend, silver as a highlight to make the skin very dewy as well as being ghost like and the eyes are red to reflect sadness and anger with a blood tear drop to finish the look.


1st stages of the makeup design
To begin this attempt, I mixed the Illamasqua satin primer with Illamasqua Skin Base in 1 and Kryolan Ultrafoundation in Ivory to create a pale complexion that isn't completely white. I concealed by mixing D3 Camouflage Concealer with the skin base under the eyes and on any blemishes. Following the base, I used a combination of the Liquid Metal colours Surge and Phenomena to create Tara's desired finish for her glowing skin. I added this colour to the tops and sides of her cheekbones, on the brow bone, nose, cupids bow and forehead. The next step was the eyes. I started by applying LC007 and LC008 from the Kryolan Lip Rouge palette all over her eyes and above the crease to create a base. I blended the base out to have very soft and rounded edges. I then applied the deep red shade from the Kryolan V2 palette just on the lid and packed on lots to create an opaque layer. Again, I blended the powder to keep the soft finish that has a strong intensity of colour. We created the product to produce the tear with the red eyeshadow and water and painted it on with a thin brush. I painted Tara's lip with the Skin Base in 1 and dabbed silver into the middle. The eyebrows were filled in with a grey shadow and I brushed the silver liquid metal colour on the ends to have them defined but more subtlely and less contemporary (the silver is almost to blend in the eyebrows with the rest of the silverly dewy skin). Finally, I painted my hand with the bright red Supracolour and pressed the colour onto her neck to resemble someone grabbing her neck.

The rest of the process

I am pleased with the base, eyes and neck for my first attempt. I feel the base is full coverage with a glowy base - which Tara asked. The silver highlight took me a while to postion correctly and have the right density on her face. As I have now had a practice, hopefully my next attempt will be much quicker as I will be confident in my placement and application. Tara was happy with the softness of the blending on her eyes as it was much like her trials. Again, it took me some time to get the right rounded shape that she desired. I would powder after applying the lipstick base on the eyes to reduce creasing that was apparent in the photos at the end. The lips were neat and have a subtle sheen which works well as it does not distract from the rest of the look but is in-keeping. 


Close-ups!
Following this attempt, I would like to improve the tear drop. As it was my first time using the combination of water and powder I was not sure what consistency we needed it to be to be runny enough to drip. I had trouble as when I put too much water the colour was too transulcent and if there was not enough water I had to paint the tear on and it did not look realistic. In our next trial, I will use more water than I did in the images to let it fall naturally and paint in any faintness. Also, as it was my first go it took me over the hour and ten minutes limit so I will speed up the process now I know what I'm doing!


Trying some angles and poses for the final photoshoot

Final Design

After experimenting with my designs for my New Elizabethan character, I have decided to incorporate all the factors I liked most that includes aspects of bridal with the colours I have come up with through the Elizabethan trends and the links with my Lady in Waiting's personality and story

To begin with the base, I have decided to keep a dewy and pale complexion but make sure it's not white. I want it to be contemporary with a nod to the white bases Elizabethan women created. Also, as I am creating a 'bridal' look for her secret wedding day I want the skin to be flawless and fresh. For the cheeks, very little contour will be used just to shape my face and bring out my cheekbones slightly to emphasis the natural 'beauty' for a wedding day. I want the pink blush to be quite heavy to reflect back to ideas behind mixing reds and whites for my Lady in Waiting and to also incorporate the technique used by the Elizabethans to have thick powder on the cheeks. A highlight shade of either a pale shimmery eyeshadow or the Illamasqua highlighter to add to the glowing skin I want. 

I chose to have the eyeshadow in unusual placing to emphasise the softness aspect, rather than having an obvious 'smoky' eye, but to also hint towards a heart shape that is very often used as a symbol in Elizabethan hair and makeup. There will be a copper shade placed on the eye to plot out the shape and create a base and then the Copper pigment will be placed on top with a damp brush to intense the colour massively. I want the eyes to be very soft so the edges must be blended a lot. A silver shade (liquid metals palette) would be applied in between the copper sections to make the eyes appear bigger and to finish off the glossy eye look. The eyebrows will have a white colour run through them quickly to not completely block them out but to be styled in an Elizabethan manner. I want to leave a lot of emphasis on the eyes to relate back to my story behind Lettice Knollys, the way her eyes were not always on her first husband as she had an affair and therefore her eyes may have been 'wandering' onto other men or by making the eyes elaborate and glossy it will attract men to her. 

Finally the lips will be coloured with a mixture of a pink and nude shade to show a contemporary modern bridal style. Copper glitter will be added to the centre to add to the alluring aspect of my interpretation of my Lady in Waiting.

To finish off the look for the photos, I want to keep my hair off my face completely. I will use this image from Zhang Jingna's shoot in Harpers Bazaar to style my hair into a plaited updo. This will reflect the high hair line and plaits that were incorporated in the Elizabethan style. 

Modern Application of Elizabethan Techniques

Products used:

  • Illamasqua Skin Base in 1
  • Supracolour palette
  • Illamasqua Eyeshadow in Sex
  • Kryolan Classic Blusher palette
  • Kryolan Lip Rouge palette
  • Kabuki Brush
  • Disposable Mascara Wand
  • Flat Top Eyeshadow Brush
  • Blusher Brush
  • Powder Brush
Health and safety:

  • Cover model
  • Check for contact lenses
  • Check for and ask model about any skin complaints or allergies
  • When applying shadows or mascaras, ask model to close eyes and work carefully
  • Make sure all brushes are clean
  • Wash hands
  • Do not double dip with products

Consulation Notes:
Name: Tara Page
Age: 19 
Hair type: Short length, very thick. Dark blonde with highlights - dyed
Skin type: Oily/combination
Skin tone: Light (pink undertones)
Eye colour/shape: Blue/Round + even shape
Allergies: N/A
Contraindication: N/A
Notes: concerned with breakouts - use sensitive products

This lesson gave us the opportunity to experiment with contemporary makeup techniques and ideas to create our New Elizabethan character. We began by applying the base. For Tara I used the Illamasqua Skin Base in 1 and applied it with a kabuki brush to buff it into the skin. This left a thin and glowy layer which is the desired application and finish I would like in my modern interpretation of my Lady in Waiting. I then proceeded to re-create the trend of 'no eyebrows' the Elizabethans had through the Golden Age. To
produce white eyebrows, I rolled a mascara wand in a mixture of a white Supracolour and the Illamasqua skin base and brushed the products through Tara's eyebrows. As her eyebrows were quite dark, Sue advised me to brush the product against the way her eyebrows sit to get the product to the root of the hairs and remove all colour. I also applied a white eyeshadow to help this and I am very pleased with the result. However, as the base is quite light and I applied a lot of the product in her brows to cover the colour, they do stand out more so than originally planned (as they are meant to be hidden). In contemporary terms, this could be an originally aspect to include as 'feral' brows are a recent trend and having a white version of this could be a clever mixture of historical and modern ideals.  

The next technique we practised was creating very blushed 'apples of the cheeks'. As opposed to modern trends of light blush blended up the cheekbones, the Elizabethans would place the colour only on the front of the cheeks, or the 'apples'. I chose to mix red and light pink together (Kryolan Blusher Palette) to create a modern peachy tone with this historical technique. The lips were dabbed with a mixture of the peach and nude pink tones from the Lip Rouge palette and were finished off with a dusting of translucent powder to create a soft and perfected look. Each of these skills could be carried across and translated into my New Elizabethan design to show a combination of historical and modern colours and techniques.


New Elizabethan Face Charts

I have created 4 initial designs to inspire a final design for my timed assessment. They have been designed with both historical and contemporary beauty ideals in mind, as well as featuring my character design for Lettice Knollys (a bride on her secret and lustful marriage).


(2/11/15)
My first design is heavily influenced by modern bridal makeup that is light, fresh and dewy looking. I wanted to include copper/gold shades (on the eyes) to represent Lettice's status in society as well as shades of pink to show the overlapping innocence and lust in her life. The eyeshadow will extend beyond the crease and over the brows (which would be white/non-existent). Her eyes would also have a white line around the lash-lines to emphasis the eyes and elude to bigger eyes to reflect the desire for a younger face in the Elizabethan era. The complexion is a mix of the lightest shade (Ivory) of the Ultrafoundation and Skin Base 1 to create a light shade that does not create just a pale face. The contouring on my face chart is very heavy, however, when this is applied it would be much lighter to only slightly shape the face. For the lips, I mixed Rose (MAC) pigment and a mixing medium to create a lip colour that was a neutral pink with reflects of gold. I want this makeup look to be light and glowy with hints of romance and royalty.


(3/11/15)
For my second New Elizabethan design, I used my research on modern beauty trends through strong contour styles from Kim Kardashian (the post can be found here). To keep the Elizabethan theme incorporated into this design, I created a monochromatic look with the colour red - a colour very often used in Queen Elizabeth I's makeup routine. I used a warmer tone of foundation to mix with the skin base (Illamasqua shade 1) to create a more modern complexion - the ideals and trend of being tanned. For the contour and highlight, I produced a very dramatic stripe with 008 lip colour (Kryolan) and blended it out with Youth Red blush (Kryolan) to reflect the craze for heavily contoured cheeks in modern times. I used the red shades from the V2 palette to create a dramatic smoky eye and finished the look of with classic red lips - a trend in both historical and modern references. Also, I left the brows (they would be white when makeup design is on face) to reflect the Elizabethan trend of over-plucking. I wanted this look to be a dramatic bridal look for an passionate bride.


(3/11/15)
Inspired John Galliano's catwalk look in 2009 (research can be found at the bottom of this post), this design emphasises both her secrecy and the Elizabethan desire to stay young. The base would be a thick layer of Illamasqua's Skin Base in 1 to reflect the technique of the women of the Elizabethan era to hide the ageing skin and attempt to demonstrate a 'virginal' look on her wedding day. Darkening the eye look shows her dark side behind her secret love affair with the Queen's previous love interest. As well as that, it could be another attempt in the look to cover up any aged skin with dark colours. Glitter would be added on the darkest part of the eye look to show her glamour and beauty that could've allured her groom. I would tinge the cheeks and lips with a pinky-red shade, much like the Elizabethans, to show a romantic and sexual side to her.


(3/11/15)
My fourth design is a simplistic and high-fashion design. The face would be completely white with a white layer for the base (Illamasqua Skin Base in 1) and a matte primer mixed in to create a blank canvas for the gold highlights. I used the shade Electrum from the Illamasqua Liquid Metals palette to highlight the cheekbones, eyes and lips - all aspects of the face that would be seen as youthful in the Elizabethan era. The eyebrows are also coloured in gold following my research into Pat McGrath's Elizabethan inspired work (on this blogpost). This simple design will create a striking and beautiful bridal Elizabethan makeup look.

After coming up with these look, I used a couple of books to start thinking of how aspects could be applied to my face and what type of products could help achieve the look I am wanting to have.

Makeup is Art by Jana Ririalli & Lan Nguyen

  • Silicon primers will help smooth over fine lines o form a smooth base for foundation to go on more smoothly.
  • Lipsticks that are cream or satin textured have a smooth appearance with a touch of sheen that appears almost moist.
  • On the catwalks, cream shimmers are often applied to the face first, then a powder shimmer is applied on top to create a strong reflective effect.
  • Loose pigment can be applied on the eye like shadow, but will need a sticky surgace to grip onto such as a cream shadow.
MAKEUP The Ultimate Guide by Rae Morris
  • [Metallic eyes] Prep the eyes but don't apply a powder and use a wet brush to apply a wash of metallic pigment to whole eyelid.
  • Apply a rose-gold  pigment over the whole eyelid. Then apply a strong copper pigment over the lid but not as high as the first colour. This will blend the colours beautifully.
  • Wetting the brush intensifies the colour and stops fallout.
Making Faces by Kevyn Aucoin
  • Outline the lips with a flesh-toned pencil and soften with a cotton swab. With your fingertip, apply lipgloss to center of bottom lip and smack


Illamasqua 'Once' Inspiration - New Elizabethan Makeup Ideas

In 2014, Illamasqua released a collection named 'Once'. For the promotion of the makeup release, Alex Box and a team of stylists created an photoshoot using the 'once' products that portray an Elizabethan atmosphere within the finished photographs. The colours used on the models face are pale and soft, leaving her looking youthful and fresh. The eyelids are highlighted and the socket lines are darkened to emphasis the woman's eyes - a style used by the Elizabethan to create a youthful look. A strong Elizabethan aspect used in this design is the strongly pigmented rouge used on the cheeks. Finished with a pink gloss on the lips, the look is an exaggerated and striking, but still beautiful, bridal look in my eyes (one I would love to incorporate within my final makeup design).

Alex Box, the creative director of Illamasqua, described the looks in terms of 'a flower starting to fade and becoming impossibly beautiful in its complex decline' (Illamasqua.com, 2014). This description optimises the facade I want to create for my Lettice Knollys inspired design. Lettice was once married in her innocence and it is rumoured that she had an affair and married this lover soon after her husbands death. Her innocence started to fade through her infidelity but her beauty prevailed in a way that resulted in marriage after the affair.

Reference: Illamasqua. 2014. 'The Edit: Once Collection Launch' [2nd November 2015] Available from: http://www.illamasqua.com/blog/once-collection/

Anne of Denmark - National Portrait Gallery

On our trip to London, we visited the National Portrait Gallery. Specifically, we looked around the Tudor and Elizabethan section. The Tudor section was overwhelmed with royalty and many portraits of Queen Elizabeth I herself, however, one image caught my eye through her angelic ora. 'Anne of Denmark' was painted at the end of the Elizabethan era, between 1605 and 1610, and demonstrates the wife of King James VI in an elegant silvery-blue gown and simply elegant makeup. This portrait reminded me instantly of a bride through the pale colours used in the material of her dress, the pearls wrapped around her chest representing virginity and her polished, pale complexion and neat hair to show royalty and wealth. The reason I have chosen to include this particular portrait in my research is to show a style of hair and makeup that symbolises to me an Elizabethan bride to tie in with my theme following Lettice Knollys story. 
Powered by Blogger.
Back to Top